- 1BKR Thr 77
Fire-up KiNG and read in the model
For this tutorial you will again use phenix.king, the version of KiNG that is distributed with Phenix. For other contexts, you can download a stand-alone KiNG application from GitHub (https://github.com/rlabduke/javadev/releases)
-
 KiNG is a Java-based kinemage graphics viewer, portable to all platforms capable of running a Java virtual machine and amenable to the addition of new plug-in modules.
KiNG has numerous tools available; we'll use the Structural Biology subset to rebuild two poorly-fit threonines in 1BKR. In Part 1, you assessed the quality of this model using the MolProbity web service and downloaded a Reduce-protonated PDB file and a multi-criterion kinemage file. You also downloaded the 2Fo-Fc and mFo-DFc maps for 1BKR from the RCSB PDB.
-
In this rebuilding demo, we are using a very high-resolution structure for didactic purposes -- problems are rare in such cases, but when they do occur their nature and their correction can be seen and understood extremely clearly. Here you control the individual steps in the correction process, so you will know what is happening and why. Software automates this for you.
-
In your terminal, navigate to your working directory, type "phenix.king 1bkrH-multi.kin.gz", or open the kinemage from the File menu inside KiNG. Conveniently, the file need not be unzipped. [On a GUI system, you can use drag-n-drop or double-click.]
Adjust the kinemage view and read in the map
-
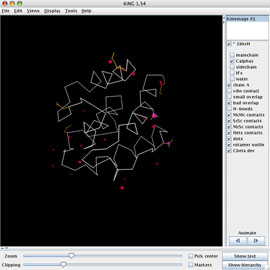
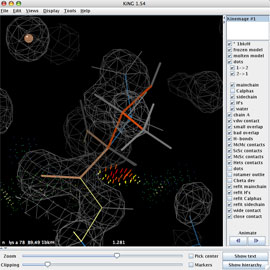
 The multi-crit kinemage contains much information, most of it abstracted in the default view. Use the kinemage display buttons on the right panel of the KiNG window to prepare for the rebuild: turn off the Cαs and turn on mainchain, sidechain, H's, and water.
-
Using Edit > Find point..., type "thr 77" in the search box and hit search to go to Thr 77. Use either the Zoom slider or right-mouse vertical-drag to zoom in. (Adjust the slab with the Clipping slider or right-mouse horizontal drag.) Note the big ball that marks the 0.349Å Cβ deviation, and then turn off the "Cbeta dev" button. Center on the Cβ with a right-click on the atom. Optionally, you can save a view for quick return.
-
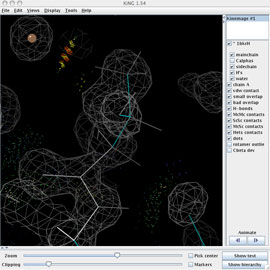
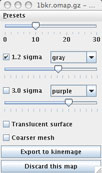 Read in the 2Fo-Fc ED map (1bkr.omap.gz) using Tools > Structural Biology > Electron density maps... The map will be displayed in the KiNG graphics window, along with the map's settings widget shown at right (which you'll want to move to a better location). The 10Å default size is OK and the default gray for the first map contour is a decent color. You may want to increase the contour level to 1.4 sigma.
Choose a new rotamer
MolProbity identified Thr 77 as an outlier both for rotamer and for Cβ deviation. You may be able to tell for yourself that some of the bond angles are distorted and chi1 is eclipsed (look down on the sidechain from its end). Turn the contact dots off (the "dots" button on the panel) and look at the beautiful density versus the model placement, to see that there's definitely a problem with Thr 77. Which atom seems to be fit worst? Since we know that the current model has a non-rotameric conformer, let's start the refitting process by seeing if any of the 3 real rotamers will match the density and give decent contacts.
-
 KiNG uses our MolProbity rotamer library (Hintze, 2016). One way of gaining access to rotamer selection is via Tools > Structural biology > Sidechain Rotator. In the resulting file-selection dialog, navigate to and open the 1bkrFH.pdb file. The kinemage will update with some new buttons: 2 near the top of the list represent the "frozen" and "molten" models used in the rotation. The Model Manager Widget is floated on your screen; in it, turn on "Probe dots", to enable interactive contact display. Select the Thr77 residue for rotation by a Ctrl-click, option-click, or middle-click on one of its atoms.
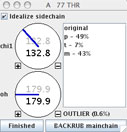
 This will pop up another widget, for control of the sidechain dihedral rotations. On this widget, you'll find a dial for each torsion angle, a listing of rotamers for this residue (with % occurrence), a rotamericity score for the current conformer, and a checkbox for sidechain idealization (toggle to see how this setting affects the model, but leave it turned on).
-
The dials work by dragging around the edge of the circle, left-mouse for fast and right-mouse for slow change. Move one slightly, to trigger update of the contact dots for this starting position (or click the ">" in the Model manager next to the Probe command line).
-
Click on each listed rotamer (p, t, or m, in the sidechain-control window) to evaluate its match to the electron density shape and orientation and its interactive probe dots (red clashes and pale green H-bods). [Make sure the "dots" button for the original multi-crit model is turned off, to allow you to evaluate the new contacts.] Right-click on the Cβ and narrow the clipping to isolate the sidechain model and density clearly. Look down the Cβ-Cα bond, but rotate your view as needed to get a feel for the fit of each rotamer. [At this stage, matching the shape and orientation of the density is much more important than being centered in it.]
-
The m rotamer gives the best agreement to the electron density shape. But it needs some improvement: the whole sidechain is shifted to one side, and the CG methyl clashes with the Lys 78 N amide. Adjustment of chi angles will not correct this problem (try it). We need some way to recenter the Cbeta back into its density, which in turn will alleviate the clashes. For this, we will use the "Backrub".
Backrub the Thr 77 mainchain
We've now got what appears to be the right rotamer for Thr 77, but the entire residue needs to be tilted back into the density. For this, KiNG has a unique and effective backbone adjustment tool, the "Backrub". [For more information about the backrub motion, see Davis et al. (2006).]
-
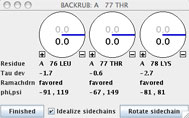
 Click the "BACKRUB mainchain" button on the A 77 THR rotator widget to invoke the backrub tool for this residue. The BACKRUB widget will pop up; take a look at the information and controls that it displays. Beneath the three rotation dials are reports for the Tau deviation, Ramachandran status, and phi,psi angles for the subject residues. Fundamental to the backrub tool are the three labeled dials that control movement of the central residue (Thr77) and its two neighboring peptides. The primary backrub motion rotates the entire dipeptide as a rigid unit around the axis between the two Cαs at i-1 and i+1; a small shift of the backbone is leveraged into a much larger change of the central sidechain position. The two secondary motions (less often needed, and at smaller amplitudes) each rotate one of the flanking peptides around the axis between its end Cαs, which helps to maintain H-bonding and carbonyl O position.
-
You may want to get a feel for the effect of the three motions of backrub, before trying to get a good fit. To do so at this time, turn off the map and the frozen model in order to concentrate on the movement of the orange sidechains and brown mainchain of the molten model. Play with the three dials of the Backrub widget (especially the primary, center one) to get a feel for their connection with the model. Return the dials to their original values when done.
-
Now, let's use the Backrub and Sidechain rotator dials to make the model better fit the density. First, make sure that the dials are in their original positions by matching the black and gray numbers for each dial. Be sure the frozen model and *1bkrH model are on. (A good position: Center on Cβ of Thr77 (right-mouse click on the Cβ) and then decrease the map coverage to 4Å at top of the map Presets widget.)
-
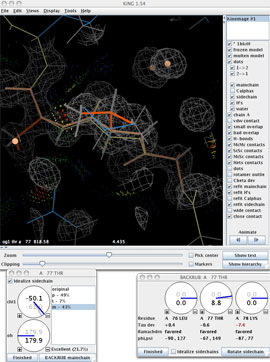
Start out by pulling the Cβ of Thr77 back into its density by using the A 77 THR dial (middle dial) on the Backrub widget. Something around 7 to 9° is a reasonable movement.
-
Turn on the purple 3σ map contours, to see that the Og1 is now in the higher-density arm as it should be. Now use the chi1 dial on the sidechain rotator to move both Og1 and Cg2 more toward the centers of their lobes of density. A chi1 angle near -50 to -55° seems close.
-
In a real refinement situation, we would quit here - this is close enough to know we've found the right local minimum, and the refinement program will twiddle the rest. However, for this lesson, continue to optimize the rebuild. Extend the map coverage to about 8Å, and try the two individual-peptide adjustments to center the backbone COs in their density and maintain H-bonding. Rotate the OH to point at the nearby water peak (no atom shown, hence no dots, since it's a symmetry related one).
Apply and save the changes
- In the Backrub tool widget: Click the "Finished" button. Answer "Yes" to keeping the changes.
- In the Sidechain rotator widget: Click the "Finished" button. Answer "Yes" to keeping the changes.
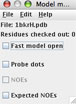
- In the Model manager window (not the main KiNG window): Choose File > Save PDB file... and in the file-selection dialog give your new PDB file a name and click save.
- 1BKR Thr 101
-
In Edit/Find point, type: 101 cb, zoom in, and turn to get a good view. Note that the Cβ is not in the density. Read in the mFo-DFc map, and choose the "Coot Fo-Fc" option under "Presets" in the map widget. The pair of +/- difference peaks around Cβ are even clearer, and the + peak at the methyl suggests it's really the Og.
-
Rebuild Thr 101, as you did for Thr 77. Include a small backrub and a rotation of the OH, to get a good H-bond to the backbone CO on the previous turn of the α-helix. This is a common motif for Thr or Ser, but the person who fit this probably didn't know that.
-
Another possible reason this misfit might not have been caught is if the aniso B's were used too early. For Thr 101 Cβ, the anisotropy elongates the density between the real and the fitted positions. Find either the 1bkr or 1bkrFH pdb file and bring it up in a text editor. Scroll down to Thr 101. The isotropic B is the last field on the ATOM record. How does the 101Cb B compare to Cg and Og, and to other heavy-atom sidechain B's nearby in sequence? Is this normal? Aniso B's have 6 values: the first 3 are the amount of motion along each principal axis of the atomic displacement ellipse, while the last 3 specify its orientation. Look at how much the first 3 terms differ for most atoms here: very seldom as much as 2:1. In Thr 101, the anisotropy is about 5:1 for Cb, but it's quite normal for Cg and Og. Is that physically possible? Aniso B's can help model real flexibility at high resolution, but provide extra parameters that also model (and mask) errors.
To see how MolProbity tools have been integrated into PHENIX and Coot, please continue with Part 3. The PHENIX GUI makes structure validation and correction very efficient and simple. The MolProbity tools used at the MolProbity website are also incorporated into the PHENIX package. The PHENIX GUI has been linked to COOT allowing interactivity between the GUI and where structure correction can be made. This allows the user to analyze local validation metrics and then go directly to the problem area in COOT where corrections can be made. (In addition to your handout, the tutorial for this section (Part 3), on how one does validation in Phenix, is linked here: http://www.phenix-online.org/documentation/tutorials/molprobity.html)
